Most of the time relationships are in Laravel are straight-forward. Things can become tricky when considering performance and cyclical relationships, however. We need to avoid both double-fetching the same data, and infinite loops.
Consider the following relationships where a User can create Blog Posts which belong to them.
If the user relationship is loaded, this is no big deal. If it isn’t, then we have to fetch the User model from the database for every post we render. This is a massive hit to performance, but we can improve it by eager-loading the relationship as part of the original query in the controller.
classPostControllerextendsController{publicfunctiongetPosts():JsonResponse{$posts=Posts::orderBy('updated_at','DESC')->limit(10)->with('user')// Eager-load user relationship as 1 query.->get();// Great performance. Two queries flat.returnresponse()->json($posts->toArray());}}
The above controller will execute two queries. One will fetch all the posts, then collect all the distinct user ids and run a second query to fetch all the users. Laravel will attach these User models to the Post models as we would expect.
Enter the Cyclic Relationship
What if we wanted to load all the posts a single user made? We know the user information already when loading their posts, so it would make sense that the reverse mapping would already be done for us. As such, the following example makes sense that it would “just work.”
Turns out Laravel isn’t that smart. We specified we wanted a user’s posts loaded, so $user->posts is loaded. But $user->posts[0]->user has to hit the database again.
The Official Way is Broken
Luckily, Laravel has the ability to manually set a relationship. Unfortunately for us, it doesn’t work in this case.
classPostControllerextendsController{publicfunctiongetUserPosts(int$userId):JsonResponse{$user=User::whereId($userId)->with('posts')->firstOrFail();// This will crash :($user->posts->each->setRelation('user',$user);returnresponse()->json($user->posts->toArray());}}
When running the above code, PHP segfaults due to an infinite loop. Laravel doesn’t seem to like that we’re iterating on a model’s children and setting a property to the parent (which doesn’t make sense to me since all objects are passed by reference in PHP, but it is what it is).
The Strange (But Easy) Solution
We can load a model’s relationships with those relationship’s relationship to the parent (what a mouth-full). It’s much easier to see in an example than try to explain in English.
classPostControllerextendsController{publicfunctiongetUserPosts(int$userId):JsonResponse{$user=User::whereId($userId)->with(['posts','posts.user'])// User -> Posts[] -> User.->firstOrFail();// This works with two queries!returnresponse()->json($user->posts->toArray());}}
As weird as it feels to load a User model with a relationship which includes the relationship to itself, it works perfectly. The query is no different than the first one since Laravel recognizes we already have that User loaded. It wont go to the database to look anything extra up, and will set the property correctly.
This works on nested relationships as well, such as: $user->with(['posts', 'posts.comments', 'posts.comments.post']);.
The process is very cumbersome for anyone who trades frequently, and it’s even worse for anyone doing development on the platform who needs to test things where multiple accounts are exchanging items.
Luckily, there’s a way around all of this It will require a bit of work up-front though, and isn’t exactly the most secure solution if your local computer is shared.
First, we need a way to generate the one-time-use two-factor codes the same way the Steam app does.
Setup The 2FA Server
Dr. McKay has created a mimicked version of the Steam Guard 2FA app. You can run the server as either a node.js application, or my own personal preference, a PHP application (since my workstation is already running nginx/php). Clone the repo from here: https://github.com/DoctorMcKay/steam-twofactor-server.
Note: My workstation is running Linux (Fedora). The concepts apply everywhere, but your setup steps may differ.
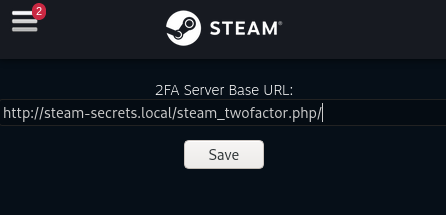
I edited my /etc/hosts file to point steam-secrets.local to 127.0.0.1, and the nginx config to match.
127.0.0.1 steam-secrets.local
/etc/nginx/conf.d/steam-secrets.local.conf
server {
listen 80;
index index.php index.html;
server_name steam-secrets.local;
root /var/www/html/steam-twofactor-server;
add_header 'Access-Control-Allow-Credentials''true' always;
add_header 'Access-Control-Allow-Methods''GET, POST' always;
add_header 'Access-Control-Allow-Headers''Accept,Authorization,Cache-Control,Content-Type,DNT,If-Modified-Since,Keep-Alive,Origin,User-Agent,X-Requested-With' always;
location ~ \.php(/|$){
fastcgi_split_path_info ^(.+\.php)(/.+)$;# Make sure that the base script existsif(!-f $document_root$fastcgi_script_name){return404;}
fastcgi_pass 127.0.0.1:9000;
fastcgi_index index.php;
include fastcgi_params;
fastcgi_param SCRIPT_FILENAME $document_root$fastcgi_script_name;
fastcgi_param PATH_INFO $fastcgi_path_info;}}
Before you can enable Steam Guard, you need a phone number attached to your account. You can attach the same phone number to multiple accounts (there’s a limit per-month for the same number, but it’s relatively high–somewhere around 30).
Ensure your email address is validated. If not, validate it from this same page before continuing.
Under Contact Info, click Add a phone number
Check your email and click Add phone number within the email
Close the new window, open the original tab with the account settings and enter the 5-digit code texted to you
Press Done
Now your account meets the requirements to run the mobile authenticator.
Enable Steam Guard
In order to use the 2FA server, we need to get the client secret. This is only given during the setup process and you can never fetch the info from Steam again.
In my case, I’m using some alts just for trading so I’ll be setting them up from scratch. If you’re using your main account and want the steam guard code from your phone, good luck. You’ll need to have the phone rooted and search through the steam authenticator files.
Regardless of whether or not you used PHP for the server, we will be using node to make the requests for setting up 2FA. Specifically, we’ll be using this repo: https://github.com/DoctorMcKay/node-steamcommunity.
$ git clone git@github.com:DoctorMcKay/node-steamcommunity.git
Cloning into 'node-steamcommunity'...
remote: Enumerating objects: 129, done.
remote: Counting objects: 100% (129/129), done.
remote: Compressing objects: 100% (84/84), done.
remote: Total 2124 (delta 72), reused 80 (delta 44), pack-reused 1995
Receiving objects: 100% (2124/2124), 421.43 KiB | 300.00 KiB/s, done.
Resolving deltas: 100% (1284/1284), done.
$ cd node-steamcommunity/examples
$ npm i
npm WARN deprecated request@2.88.2: request has been deprecated, see https://github.com/request/request/issues/3142
npm WARN deprecated har-validator@5.1.5: this library is no longer supported
added 86 packages from 122 contributors and audited 86 packages in 2.386s

2 packages are looking for funding
  run `npm fund` for details

found 0 vulnerabilities

$ node enable_twofactor.js
Username: my_test_account
Password: my_test_password
An email has been sent to your address at gmail.com
Steam Guard Code: A12TV
Logged on!
Writing secrets to twofactor_76561197960287930.json
Revocation code: R10111
SMS Code: 61361
Two-factor authentication enabled!
Congratulations! The hard part is done.
Grab the file that was generated and copy the contents it into a file called <your_account_name>.json inside the secrets directory of the two-factor server.
In order to enter the 2FA codes automatically, and to click the mobile trade confirmations, we’ll need a userscript. These are snippets of javascript that run locally in your browser when certain pages are accessed. You need a browser extension in order to run them, so ensure you have Greasemonkey (Firefox) or Tampermonkey (Chrome).
Almost every democratic candidate for president in 2020 wants to raise the federal minimum wage from $7.25/hr to $15/hr. Here in Washington, our state minimum wage is already $12/hr and the sky hasn’t fallen. However, it still means annually someone working full time is only making $24,000/yr (assuming they take 2 weeks off at some point)–hardly a living wage.
What is a living wage?
MIT did a study this year and found that the living wage is $16.54/hr for a family of four, or $68,808/yr. This assumes that two adults are earning the same wage for a single household. Of course, major cities have a significantly higher living wage requirement. For instance, San Francisco’s living wage is over $94,000. But for the sake of argument, let’s skip the metro outliers and focus on a national plan.
The Numbers
With the broad support for a minimum wage increase, I wondered what it would look like if instead of just raising the minimum wage, we gave everyone a decreasing raise by dollar bracket.
So the idea is for every $1/hr someone makes, the percentage of raise they get decreases 5% from the previous bracket. So if someone made $12/hr and got a 50% raise, the $13-$13.99 bracket would get a 47.5% raise, the $14-14.99 bracket would get 45.13%, etc. Around $80-90/hr the raises drop below 1%. Just to avoid getting too into the weeds, we can say the raises stop at $100/hr.
Using Washington’s higher minimum wage, this approach yields pretty good results. The base minimum goes from $24,000/yr to $36,000/yr which, if not living in downtown Seattle, seems like you could live on it just fine. It also means a married couple both working would be guaranteed $72,000/yr instead of $48,000/yr.
However, running the same algorithm with the federal values doesn’t seem impactful enough. The starting value is very low, so even with a 50% raise we end up quite a bit under the current WA minimum wage. The lowest bracket workers would end up earning $43,500/yr as a couple, up from $29,000.
This is still a drastic improvement over the current system. And I feel like it would have more bipartisan support than simply raising the minimum wage. Conservatives view a minimum wage hike similar to a poverty subsidy, since it only applies to those at the very bottom. A pay raise setup in this structure, while similar, affects people who earn up to around $190,000/yr. In this way it will affect the lowest earners up through the middle class.
Under the Washington plan, we actually surpass the living wage mark slightly in the lowest bracket. But with the federal plan, there’s still five pay brackets below the threshold. For jobs that have a built-in overtime mechanic, that wont be a big problem to hit it, but many jobs don’t. So what would it take to get there?
If we want to use the same algorithm for pay increases, we need to start at $11/hr. Then after the raises, we end up at $16.50 for the first bracket. I can’t see congress increasing the wages that much at all once, so maybe we have to settle, for now, on the federal plan above. There will be concerns about a big hike in pay all at once because a lot of companies have come to rely on exploiting the workforce to survive. We also will need time to adapt related legislation, such as assistance programs. Estimating how many people will no longer require SNAP or subsidized housing is tricky since it relies on predicting human behavior as well.
Why is it important?
Studiesshow that the lowest earners spend almost all their earnings within the local economy. They’re not the ones spending abroad or stashing capital away. Every dollar they earn goes straight back to businesses. Restaurants who are concerned about not being able to pay their wait staff or dishwashers this higher minimum wage will soon see a boon to their clientele, which means more money, which means they can absolutely afford to pay the increased wages.
Taking a look at one study in Kenya where cash was given to impoverished families, we can see how this lifts everyone up.
The researchers identified about 65,000 households across an impoverished, rural area of Kenya and then randomly assigned them to various groups: those who got no help from GiveDirectly and a “treatment group” of about 10,500 families who got a one-time cash grant of about $1,000.
“That’s a really big income transfer,” notes Miguel. “About three-quarters of the income of the [recipient] households for a year on average.” It also represented a flood of cash into the wider communities where they lived. “The cash transfers were something like 17% of total local income — local GDP,” says Miguel.
Did you catch that? A whopping 75% of their annual income as a lump-sum. Using WA’s minimum wage, that’s equivalent to $18,000. Most of that money went into buying much-needed essentials, but the effect of that was massive. If this were a smaller consistent payment, such as with a wage increase or a universal basic income, it would be a consistent trickle which both citizens and businesses could rely on.
“That money goes to local businesses,” says Miguel. “They sell more. They generate more revenue. And then eventually that gets passed on into labor earnings for their workers.”
The net effect: Every dollar in cash aid increased total economic activity in the area by $2.60.
But were those income gains simply washed out by a corresponding rise in inflation?
“We actually find there’s a little bit of price inflation, but it’s really small,” says Miguel. “It’s much less than 1%.”
Here we see the compounding effect raising the poor has on the economy. The chain reaction it sets off raises the economy 260% from what you put in. Inflation targets set by the fed are around 3%, and lately we’ve been behind that goal, so it would help us there as well.
A Moral Imperative
I could go on and on about how handling people’s basic needs leads to huge improvements to mental health, reduction in crime, higher educational outcomes, more productive workers, greater social engagement, more opportunities for investment, a healthier population, etc. The studies are overwhelming. Take a look for yourself.
One of the major factors in all these improvements is that parts of your brain shut down when in survival mode. Worrying about food or shelter means you literally cannot learn certain things due to human biology. This can trap people into making recurring poor decisions and never escaping the cycle of poverty. Paying a living wage solves a huge portion of society’s woes, and it’s really easy to do!
The Scale
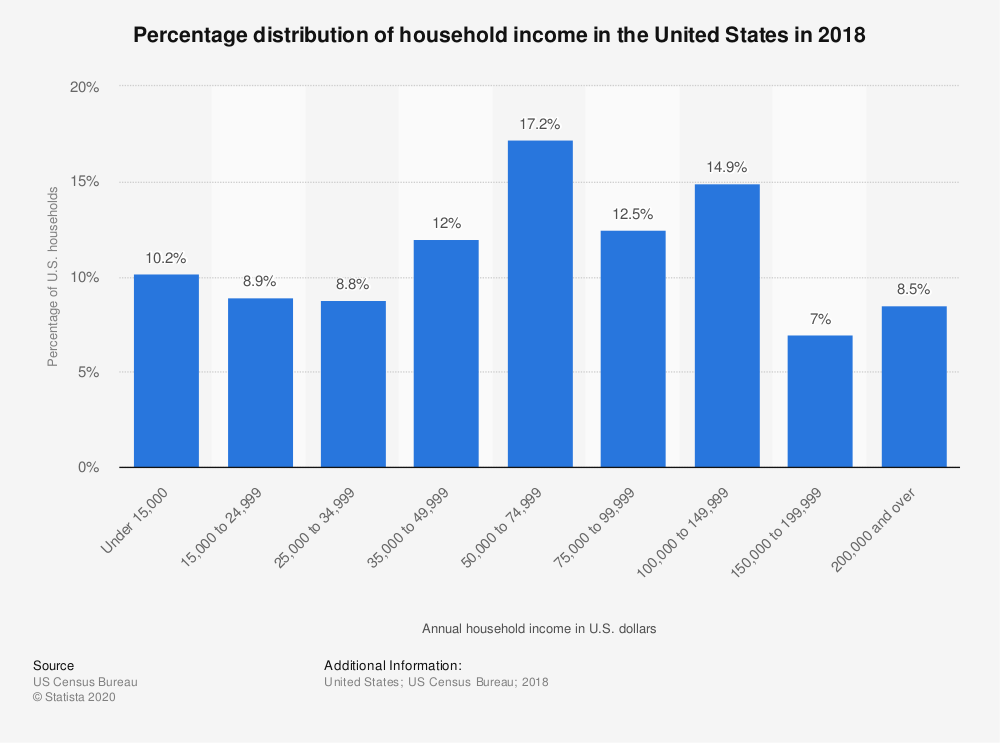
The United States has a lot of poor people. In fact, 40% of all households earn less than $50,000/yr, which is still more than $18,000 under a “living wage.”
There are diminishing returns on how much money you can give someone before it stops coming back into the local economy in significant ways. If we focus on getting people closer to a living wage, even if we don’t commit to bringing everyone there, the economy as a whole will explode. Right now the bottom 50% of the population only holds 1.4% of the nation’s wealth, so it wont take much of our collective wealth to raise them up.
Using the 260% value from before, if we increased the wealth of everyone in the lowest 50% of the population by an average of 30%, that would only cost $450 billion (about the cost of Medicaid), but it would boost the economy by $1170 billion (5.7% of total GDP). Moreover, if you count the boost to the economy as taxable income at around 17%, about $200 billion would actually be raised as taxes. Not to mention sales tax, or the savings from state and federal assistance programs due to people no longer requiring them.
But what about employers?
I hate this question. If an employer is paying minimum wage right now, it usually means their employment is being subsidized. If you make $7.25/hr, you can’t afford rent, food, or heating without assistance. This all comes out of taxes now. This seems like a broken system with a lot of overhead to me. The government has to collect taxes from businesses and citizens in order to fund programs to give that money back to the people who aren’t being paid enough? Please.
If your company can’t survive without paying people a living wage, then it doesn’t deserve to exist. And if it does, it should go through some kind of grant program in order to fairly pay employees. This is also why we specifically need to implement changes on a federal level. An employer in WA is at a disadvantage over other states if they employ minimum wage workers. We don’t want to cause businesses to start hopping state borders due to policy changes, since that too is expensive.
Yes, it will mean some businesses will fail (even if it’s just some). I think we should give employers time to adapt by phasing the program in over a couple of years. We have a lot of ground to make up, but a 50% increase all of a sudden isn’t going to be easy in some sectors. Warn them that it’s coming, and let it hit slowly. If they can’t make changes over a few years, they will go under and leave space for someone else to figure out a better way.
Yes, SodaStream is cheaper than La Croix if you consistently drink at least 1 can of La Croix per day.
tl;dr
I could sit here and draw out a huge story for you about why it might be better for some people than others, but let’s not waste any time. The real meat of this question is simply math, so we’ll jump right in.
I was buying my La Croix by the 24-pack at Costco, which I imagine is the cheapest way to get it. This costs $9.49 per case. To make things easy, we’ll use the price per ounce.
$9.49 / (12oz * 24 cans) = $0.03295138888 / oz
Now, unlike buying the product on-demand, the SodaStream products have a major up-front cost. Currently there are three offerings: Fizzi Classic, One-Touch Electric and Fizz Premium. I prefer simplicity, and since there’s no reason to include electricity in any model I’ve skipped the One-Touch in this analysis.
At the time of this writing, the Classic is $89.99 and the Premium is $194.96. We can already tell that if it’s possible to break even at all, it will take a while.
Additionally, we should try to get 3 canisters of CO2, so that when two are empty we can run them through the exchange program while still keeping one on-hand. Each canister of gas makes about 60L of water, but buying these three up front does raise the initial cost by $59.98. However, it also makes the first 180L of “water cost” pre-paid.
Assuming you use municipal water which is essentially free, and you’re flavoring that water with official SodaStream flavors, such as Lemon and Lime, you end up with the following figures.
La Croix
Up-front cost: $0.00 Cost per oz of water: $0.03295138888 Cost per oz of flavor: $0.00 (included) Total cost per oz: $0.03295138888(3.3 cents)
SodaStream Fizzi Classic
Up-front cost: $149.97 Cost per oz of water: $0.00196910549 (First 180L are “free”; this is the price of refilling 2 canisters at a time after that point) Cost per oz of flavor: $0.00737860057 Total cost per oz: $0.00934770606(9/10ths of a cent)
SodaStream Premium
Up-front cost: $254.94 Cost per oz of water: $0.00196910549 (First 180L are “free”; this is the price of refilling 2 canisters at a time after that point) Cost per oz of flavor: $0.00737860057 Total cost per oz: $0.00934770606(9/10ths of a cent)
Result
You break-even with the Fizzi Classic around the same time you’d run out of the initial bottles of CO2, which is just shy of the 23 cases mark, or around 550 cans of La Croix. If you have a 2-can-a-day habit, it will take about nine months.
The premium has the same math with a much higher starting point. It breaks even around 320L, or 37.5 cases (900 cans). If you have a 3-can-a-day habit, it will take about 10 months.
Thinking Deeper
Now this only measures the financial impact on the consumer. But consider the broader implications as well.
Drinking La Croix will produce hundreds of aluminum cans, plastic packaging, cardboard packaging, fuel required for shipping pallets of water across the country, fuel for driving back and forth to the store to get them all home, and then more fuel and processing power to send all the trash back to the recycling plant.
With SodaSteam, all you have to do is press a button on a machine for a couple of seconds. The only shipping after the initial purchase is the CO2 canisters, which are re-filled with CO2 and re-used without needing to recycle. And they can be picked up from your door by the post office, who in all likely-hood is already going to drive by your house that day anyway.
On a personal note, I will say that it’s slightly more work to use a SodaStream-like product than just grabbing a can and running. But honestly, it’s sort of satisfying to press the button each time. I use the premium version due to the glass carafes. I’ll never have to replace them, and I can just pop them into the dishwasher with no worries about them melting.